Before you start your CMDB project, the first and most important step – before all others – is to install and set up the appropriate software. In comparison to the many products already on the market, which require sophisticated preparatory work or even external support in this regard, i-doit makes it easy for you. Within just 10 minutes, you can start your documentation project.
A tip to get you started: please make sure to read the information on system requirements in our “Knowledge Base”.
In this article we will look at installing i-doit on a Cloud or vServer, using Ubuntu 18.04 LTS operating system. The installation requires very little Linux knowledge and is usually completed within 10 minutes. After installation, i-doit has over 100 predefined object types, which means you can start immediately with the documentation of the IT infrastructure.
Step 1: Create server and connect to SSH
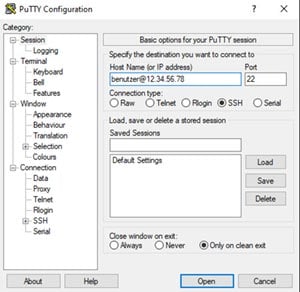
You can create new virtual machines via the customer or administration area of your service provider. In the video we use a Cloud server from Strato, with 2 vCPU, 2 GB RAM and 20 GB hard disk space. You can find the access data and IP of your server using most providers, on the detail page of your created server. There you will also find the username and password for SSH access. To connect to the server you can use the program “PuTTY” using Windows or “Terminal” on a MAC.

After you have successfully connected to the server via ssh, you can start the installation.
Step 2: Updating the standard packages
By using our installation script, you don’t need to configure the server, install packages or additional services in advance. Nevertheless we recommend you to update to the latest version of the installed packages. Depending on the service provider, the pre-installed packages will differ. You can use the following command to update the package sources and perform an update.
apt-get update && apt-get upgrade
Step 3: Download the installation script
What tasks does the installation script perform?
The installation script carries out all configurations on the server so that you can run i-doit on it. The prerequisite for the operation of i-doit is a so-called LAMP stack. LAMP is the short form for:
Linux – In our example, we choose Ubuntu 18.04 LTS. Other OSes are supported. Please have a look at the system requirements in our knowledge base.
Apache – You need a web server to access web applications.
MariaDB – i-doit stores all data in a database. The information of the later documentation is also stored there.
PHP – The server-side programming language must be present for i-doit to run. Please note that you have to use PHP 7.4. Since version 1.19 i-doit pro also supports PHP 8.
At the beginning, since only the operating system (Ubuntu 18.04 LTS) is installed, all other requirements must still be met. The script installs and configures the web server “Apache”. Furthermore it automatically creates the database (MariaDB) with users and tables. Finally it installs PHP with all necessary extensions.
Download
In order to execute the installation script, you must download it to the server. To do this, use the “wget” command and the URL for the script.
wget https://raw.githubusercontent.com/bheisig/i-doit-scripts/master/idoit-install
In order for the script to be authorised to make all changes and installations on the system, you give it the necessary permissions by “chmod”:
chmod 755 idoit-install
Step 4: Perform installation
The preparations are now complete. You can now execute the installation script with the following command:
./idoit-install
The script will guide you through the whole installation. The configuration of a proxy server is usually not necessary and can be skipped with “n”. When the installation is complete, you will be shown the URL where you can open i-doit in your browser.
Important note: SSL certificate
Before you log into i-doit for the first time, you should add an SSL certificate. This ensures that your entries are transmitted in an encrypted form. You can manually create a new certificate or use an existing one. If this is too much effort, you can also automatically create a certificate with “Certbot”. With this tool all necessary configurations are completed.
sudo apt-get install certbot python-certbot-apache
certbot –apache -d <EnterYourDomain> (z.B. i-doit.Ihre-Domain.de)
Tip: If you now call up your i-doit installation via “https”, you can test whether the installation was successful.
Step 5: Activate the licence
If you call up the URL of your i-doit installation, you’ll be taken directly to the login mask. Here you can log in with your user name and password. If you created the standard users during installation, the username and password are: admin / admin
In the next step you should now import a valid licence. Then you can use i-doit to its full extent. You can find your licence in the customer portal at portal.i-doit.com.
The installation of i-doit is now complete and your system is ready for use.
Conclusion
By using the installation script, in less than five minutes you can install i-doit on your Cloud or vServer. All necessary packages are installed with the help of the script and all configurations are fully carried out automatically. Thanks to the installation script, the effort required is reduced to practically nothing.
Of course you can also use our installation script for servers in your own infrastructure.
The installation and operation on a Cloud or vServer is useful if your own resources are not sufficient. If you want to document over several locations, the use of Cloud servers is also a good idea. This choice is advantageous if you cannot implement a VPN between the locations.
Likewise, the running costs for the operation can be better calculated and savings can be made. In the event of a hardware failure, there is no need to purchase replacement components. Your service provider replaces the defective components free of charge. vServers are available from as little as 5€ per month, and from 20€, even with dedicated hardware.
Whether using a Cloud, vServer or your own IT infrastructure, i-doit adapts to your existing resources and business objectives to make your documentation project a success.
If you have any questions regarding installation or operation, please contact: help@i-doit.com.
Links to further articles & resources
All information about installation can be found in the Knowledge base.


